I have my DNA results. What’s next?
An exciting, growing area is the use of DNA testing for family research. Now that you have your DNA results, here are 10 steps to move you forward:
1. First of all, ask yourself, “Why did I get my DNA tested?” Your reason often determines how deep you dive into the exciting world of DNA.
Did you test out of curiosity, with little knowledge of DNA? Did a relative ask you to test? Are you an adoptee looking for your biological parents? Or did you take this step to expand your own family tree or break through a brick wall?
No matter what your reason, if you’re new to DNA, promise yourself that you won’t be intimidated. Like anything new, you face a learning curve. How much you put into this affects what you get out of it.
2. With your objective in mind, take the time to follow the directions on the website of the DNA testing company you used. There are no “one size fits all” directions because each testing company is different with its own set of tools.
Chances are you submitted your sample to one of the top companies for DNA testing for genetic genealogy – including Family Tree DNA, AncestryDNA, 23andMe and MyHeritage. This article doesn’t intend to endorse one or the other. There are pros and cons to each site, depending on your needs.
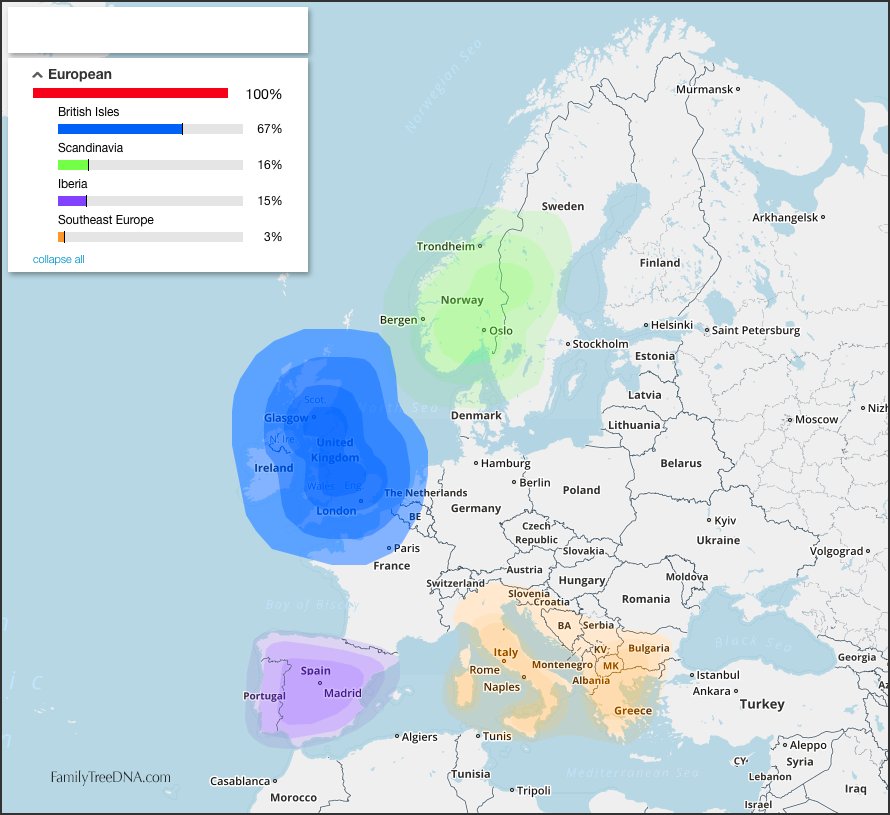
3. What tools do I use? It depends on what your testing site offers you. One of the first things you’ll see is a chart or map showing your ethnicity percentages. For example, your chart may say that you’re 67% British Isles, 16% Scandinavia, 15% Iberia and 3% Southeast Europe.
 4. Next, check out your list of matches or cousins. Don’t overlook this! The match list is the heart of DNA testing for genealogy. You will find pages of people who match your DNA, selected from everyone who took the same test on your site. Each of these DNA matches should be ranked according to the closeness of the relationship to you, with an estimated range, such as 2nd to 4th cousin.
5. Once you’ve noted the list of matches, it’s time to set up your privacy settings on your site. Since the whole point of a DNA site for genetic genealogy is to interact with your DNA matches to add to your family tree, it makes sense that your matches have access to certain info about you. Like you, they should be able to contact you via email or through a site’s messaging system. After that, it’s wise to turn off public view for anyone else who isn’t a match. But keep in mind that some sites like AncestryDNA require a public tree if you want to use certain features.
6. Depending on what the site allows, set up information in advance for your matches – access to a family tree, a list of ancestral surnames, or your most distant paternal and maternal ancestors. The more info you provide, the easier it will be for others to identify where you might intersect on your family trees.
7. Next, go back to your list of matches and check out the features on your site. A site may charge a one-time fee for the lifetime of the platform, but another may charge a subscription to access other features. You might find a tool for shared or “in common with” matches, where you can select a match and see what matches you share or don’t share. If a particular match posted their family tree, you can view that tree to find clues how you may be related, and likewise they can check your tree.
Look for the number of “shared centimorgans,” which is the unit used to show the sum of autosomal DNA that you share, and its longest block. The closer the relationship to you, the higher the number is. You may also see a tool called a “chromosome browser,” where you can graphically compare different matches. You can map out exactly what DNA segments (blocks) you share with your match on each chromosome. You also can use a method called triangulation to verify a common ancestor by seeing if two others match each other in the same place they match you.
These are just some of the tools you may find. If you don’t see a certain tool, your testing company may not provide it or you may need a subscription to use it.
 8. After you set up your info and settings, it’s time to get started and contact a match. Choose a person that your testing company predicts is a good match. Check out his/her ancestral names and family tree, if they provide them, and how much DNA you share, if your site provides the tools. Example of email initiating contact:
Subject Line: “DNA Match-Your Name to Their Name”
I notice that I’m a match to you at [name of testing company]. Your connection to me is estimated at the 2nd to 3rd cousin level, so chances are we share a common ancestor. From looking at our trees, the DNA match may be from my Callan line in Co. Kilkenny, because you and I both have Callan ancestors from the same Irish county.
I’m attaching my pedigree chart and a list of ancestral surnames. You can also check my tree at [location of tree]. It would be great to make a family tree connection. I look forward to hearing from you.
9. As you go along, teach yourself DNA basics, which starts like this: The nucleus of each of your cells contains 23 pairs of autosomal chromosomes. For the first 22 pairs, you inherit one chromosome from your mother and one from your father. The 23rd pair contains the “sex” chromosomes. Like the lottery, they determine whether you’re male or female. If you end up with x and y combo, you are a male. If you have x and x, you are female.
Your basic DNA test is called the autosomal test, which covers both your mother and father’s side. It takes you back to perhaps five generations because autosomal DNA decreases with each generation.
Not all testing companies offer other kinds of DNA tests that reach farther back in time. Males can test for Y- DNA, inherited from the father to only sons, following the father’s line; and both females and males can test for MtDNA (mitochondrial), inherited only from the mother to both sexes, following only the mother’s line. Both female and males can also apply X-DNA testing to look at markers on the X-chromosome(s).
10. After you get used to DNA, you may want to extend your reach by uploading your raw data to a 3rd party site like Gedmatch.com, which is widely used by genealogists. The benefit is that you have more tools and more matches because you’re entering a pool of others who have uploaded from other sites. Check Gedmatch to see if it allows you to upload the data from your particular testing company.
These 10 steps may feel like the tip of the iceberg, but once you get started with DNA for family research, your exciting journey begins!